×
×
Project Tutorials
Introduction Directory Structure Project Setup Remove index.php using htaccess Change Default Controller CSS Add in Project Create Login Page Design Validation on Login Login with Database Flashdata on Login Display Username after Login Logout Design Dashboard Page List user data form database Insert Data Flash message show if data inserted Delete data from datebase Edit data from datebase Active Inactive user status Show active users detail on home page Image Upload Edit Image View Image on Home PageView Image on Home Page
In this tutorial, we are going to learn how to show user image in home page.
Step 1 : We will write the query in Model (Project_model.php), so that we can get the uploaded image from the userdata table.
<?php
class Project_model extends CI_Model
{

	public function list_active_user_detail()
	{
		$query = $this->db->select('id,username,email,contact,status,photo')
						  ->from('userdata')
						  ->where('status',1)
						  ->order_by('id','desc')
						  ->get();
		return $query->result();
	}

}

?>
Step 2 : Open your Project controller and we will write the code to send your image from model to view.
<?php
defined('BASEPATH') OR exit('No direct script access allowed');

class Project extends CI_Controller {

	public function index()
	{
		//load project_model
		$this->load->model('project_model');

		//get active user list from database
		$user_list = $this->project_model->list_active_user_detail();

		//pass all user details on view page
		$this->load->view('project',['userdata'=>$user_list]);
	}

}

?>
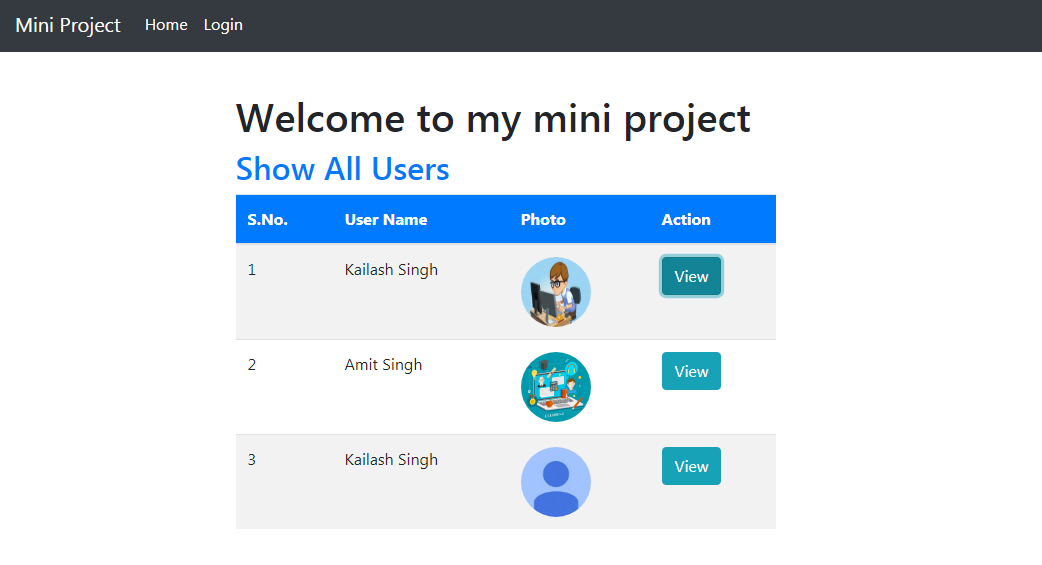
Step 3 : Show image in home page (project.php).
<table class="table table-striped">
 <thead>
   <tr class="btn-primary">
     <th>S.No.</th>
     <th>User Name</th>
     <th>Photo</th>
     <th>Action</th>
   </tr>
 </thead>
 <tbody>
  <?php
  if(count($userdata))
  {
    $count = 0;
    foreach ($userdata as $user)
    {
  ?>
   <tr>
     <td><?php echo ++$count; ?></td>
     <td><?php echo $user->username; ?></td>
     <td>
      <!-- Show user photo is here in table-->
       <?php if($user->photo != ''){ ?>
        <img src="<?php echo base_url(); ?>upload/<?php echo $user->photo; ?>" style="width: 70px; height: 70px; border-radius: 50px;">
      <?php }else{ ?>
        <img src="<?php echo base_url(); ?>upload/user.jpg" style="width: 70px; height: 70px; border-radius: 50px;">
      <?php } ?>
     </td>
     <td>
       <button type="button" class="btn btn-info" data-toggle="modal" data-target="#myModal<?php echo $user->id; ?>">View</button>

       <!-- Modal Popup Code Start Here-->
        <div id="myModal<?php echo $user->id; ?>" class="modal fade" role="dialog">
          <div class="modal-dialog">
            <div class="modal-content">
              <div class="modal-header">
                <h4 class="modal-title" style="float: left;">User Details</h4>
              </div>
              <div class="modal-body">
                <h4><b>User Name :</b> <b class="text-success"><?php echo $user->username; ?></b></h4>
                <h4><b>Email :</b> <b class="text-success"><?php echo $user->email; ?></b></h4>
                <h4><b>Contact :</b> <b class="text-success"><?php echo $user->contact; ?></b></h4>

                <!-- Show user photo is here in modal popup-->
                <h4>
                  <b>Photo :</b>
                  <?php if($user->photo != ''){ ?>
                    <img src="<?php echo base_url(); ?>upload/<?php echo $user->photo; ?>" style="width: 70px; height: 70px; border-radius: 50px;">
                  <?php }else{ ?>
                    <img src="<?php echo base_url(); ?>upload/user.jpg" style="width: 70px; height: 70px; border-radius: 50px;">
                  <?php } ?>
                </h4>
              </div>
              <div class="modal-footer">
                <button type="button" class="btn btn-default" data-dismiss="modal">Close</button>
              </div>
            </div>
          </div>
        </div>
         <!-- Modal Popup Code End Here-->

     </td>
   </tr>
 <?php } } ?>
 </tbody>
</table>
Result :
Source Code:
Codeigniter tutorial for beginners
In this project. We are providing you, how to create small project in Codeign....
Source CodeElevenstech Web Tutorials
Elevenstech Web Tutorials helps you learn coding skills and enhance your skills you want.
As part of Elevenstech's Blog, Elevenstech Web Tutorials contributes to our mission of “helping people learn coding online”.
Read More
Newsletter
Subscribe to get the latest updates from Elevenstech Web Tutorials and stay up to date
Copyright 2018 - 2026 Elevenstech Web Tutorials All rights reserved.

 Click to Join