How to use Toastr Alerts in PHP
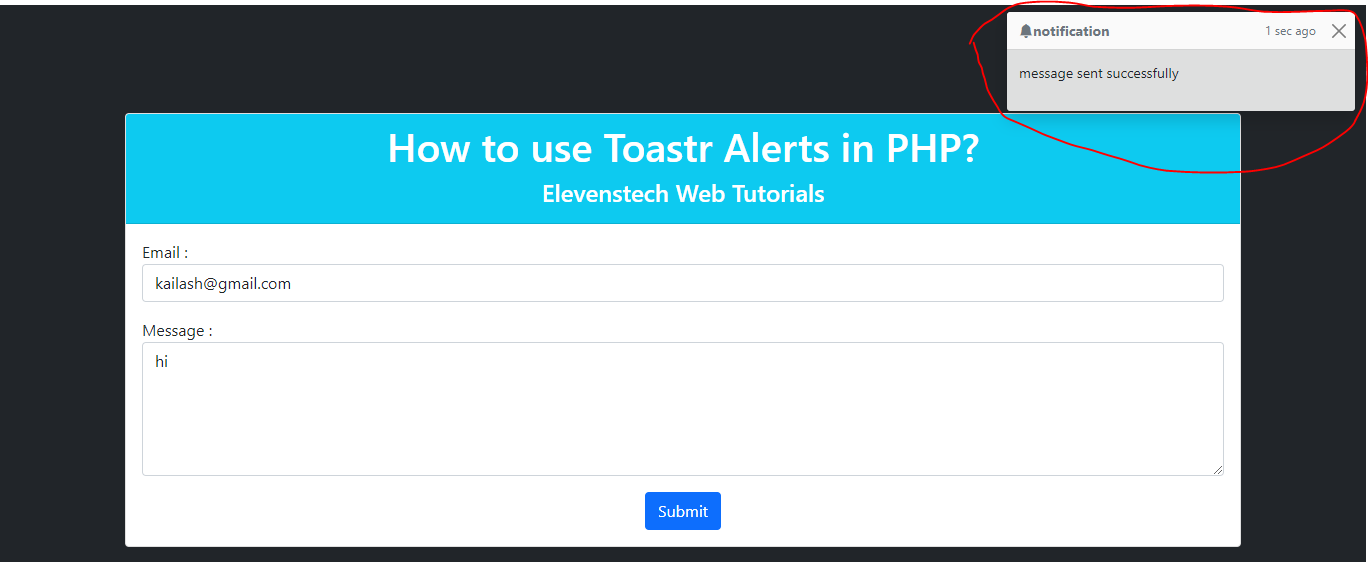
How to use Toastr Alerts in PHP
Published Aug 29,2022 by Kailash Singh
0 Comment 11975 Views
In this tutorial, we are going to teach you, how to use Toastr Alerts in PHP.
This post will give you simple example of Creating Real Time Notification System in PHP and AJAX and also check How can I show a Toast notification on form submission.
Step 1: Create users table in your database.
CREATE TABLE `elevenstech_youtube`.`users` (`id` INT NOT NULL AUTO_INCREMENT , `email` VARCHAR(250) NULL , `message` TEXT NULL , PRIMARY KEY (`id`)) ENGINE = InnoDB;
Step 2: Create index.php page.
<!DOCTYPE html>
<html>
<head>
    <title>How to use Toastr Alerts in PHP? - Elevenstech Web Tutorials</title>
    <link href="https://cdn.jsdelivr.net/npm/[email protected]/dist/css/bootstrap.min.css" rel="stylesheet">
    <link rel="stylesheet" href="https://cdn.jsdelivr.net/npm/[email protected]/font/bootstrap-icons.css">
    <script src="https://code.jquery.com/jquery-3.5.1.min.js"></script>
    <script src="https://cdn.jsdelivr.net/npm/[email protected]/dist/js/bootstrap.bundle.min.js"></script>
    <style>
    .toast
    {
        position: absolute;
        top: 10px;
        right: 10px;
    }
</style>
</head>
<body class="bg-dark">
    <div class="container mt-5 pt-5" >
        <div class="row">
            <div class="col-md-12">
                <div class="card mt-3">
                    <div class="card-header text-center bg-info text-white">
                        <h1>How to use Toastr Alerts in PHP?</h1>
                        <h4>Elevenstech Web Tutorials</h4>
                    </div>
                    <div class="card-body">
                        <form id="submit_form">
                            <div class="mb-3">
                                <label>Email : </label>
                                <input type="email" name="email" id="email" class="form-control" />
                            </div>
                            <div class="mb-3">
                                <label>Message : </label>
                                <textarea name="message" id="message" class="form-control" rows="5" ></textarea>
                            </div>
                            <div class="d-flex justify-content-center">
                                <input type="button" name="submit" id="submit" class="btn btn-primary" value="Submit" />
                            </div>
                        </form>
                    </div>
                </div>
            </div>
        </div>

        <div class="toast" id="myToast" data-bs-autohide="true">
            <div class="toast-header">
                <strong class="me-auto"><i class="bi-bell-fill"></i>notification</strong>
                <small>1 sec ago</small>
                <button type="button" class="btn-close" data-bs-dismiss="toast"></button>
            </div>
            <div class="toast-body">
                <p id="error_message"></p>
            </div>
        </div>

    </div>

    <script>
        $(document).ready(function(){
            $('#submit').click(function(){
                var email = $('#email').val();
                var message = $('#message').val();
                if(email == '' || message == ''){
                    $('#error_message').html("All Fields are required");
                    $('.toast').toast('show');
                }else{
                    $.ajax({
                        url:"insert.php",
                        method:"POST",
                        data:{email:email, message:message},
                        success:function(data){
                            $('.toast').toast('show');
                            $('#error_message').html(data);
                        }
                    });
                }
            });
        });
    </script>

</body>
</html>
Step 3: Create insert.php Page.
<?php

    //Database Connectivity
    $servername = "localhost";
    $username = "root";
    $password = "";
    $dbname = "elevenstech_youtube";
    $conn = new mysqli($servername,$username,$password,$dbname);
    if($conn->connect_error){
      die ('connection faild:'.$conn->connect_error);
    }

    //Insert Datails in Database
    $email = $_POST['email'];
    $message = $_POST['message'];
    $sql = "INSERT INTO users (email,message)VALUES('$email','$message')";

    if ($conn->query($sql)===TRUE) {
        echo "message sent successfully";
    }else{
        echo "Error: ".$sql."<br>".$conn->error;
    }

    $conn->close();
?>
Comments ( 0 )
Elevenstech Web Tutorials
Elevenstech Web Tutorials helps you learn coding skills and enhance your skills you want.
As part of Elevenstech's Blog, Elevenstech Web Tutorials contributes to our mission of “helping people learn coding online”.
Read More
Newsletter
Subscribe to get the latest updates from Elevenstech Web Tutorials and stay up to date

 Click to Join