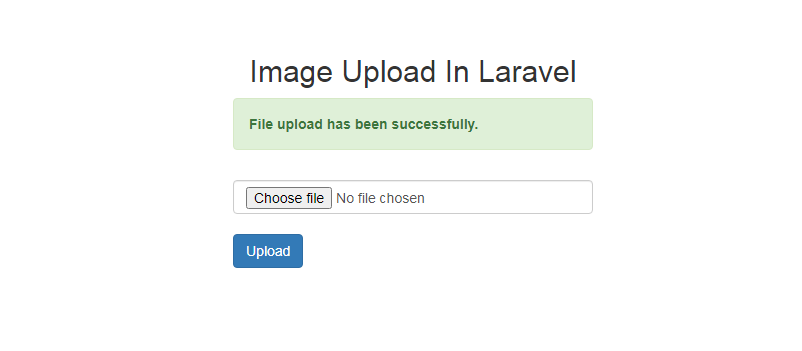
Image Upload in Laravel Share
In this tutorial, i am going to teach you how to upload image using Laravel.
Step 1 : Create table in database.
CREATE TABLE `elevenstech_laravel`.`image_file` ( `id` INT NOT NULL AUTO_INCREMENT , `image` VARCHAR(300) NOT NULL , `created_at` TIMESTAMP NOT NULL DEFAULT CURRENT_TIMESTAMP , PRIMARY KEY (`id`)) ENGINE = InnoDB;
Step 2 : Create controller for Upload image with the help of command.
php artisan make:controller MainController
eg :

Step 3 : Load view page in main controller.
<?php

namespace App\Http\Controllers;

use Illuminate\Http\Request;

class MainController extends Controller
{
    function index()
    {
        //Load view page
    	return view('welcome');
    }
}

?>
Step 4 : Create view file (welcome.blade.php) in view folder to create design of upload image.
<h2>Image Upload In Laravel</h2>


<!-- Show success message -->
@if($message = Session::get('msg'))
    <div class="alert alert-success alert-block">
        <strong>{{$message}}</strong>
    </div>
@endif

<!-- Create form--->
<form action="{{url('/main/upload-file')}}" method="post" enctype="multipart/form-data">

    {{csrf_field()}}

    <input type="file" name="image" class="form-control">

    <input type="hidden" name="token" value="{{csrf_token()}}">

    <span style="color: red; ">@error('image'){{$message}}@enderror </span>

    <button type="submit" class="btn btn-primary">Upload</button>

</form>
Step 5 : Now create a route (web,php) for Upload file.
Route::post('/main/upload-file','MainController@uploadfile');
Step 6 : Create uploadfile function in main controller to upload image.
<?php

namespace App\Http\Controllers;

use Illuminate\Http\Request;
use Illuminate\Support\Facades\DB;
use Illuminate\Support\Facades\Redirect;
use validator;
use Auth;

class MainController extends Controller
{
    function index()
    {
    	return view('welcome');
    }

    //Here i am crating a uploadfile fuction
    function uploadfile(Request $request)
    {
    	//Validation for image
    	//only accept jpeg, jpg, png, gif
	    $request->validate([
           'image' => 'mimes:jpeg,jpg,png,gif|required|max:1000',
        ]);

        $request->input();

        //Upload image code
	    if ($request->hasFile('image'))
	    {
	    	//get image file
	        $image = $request->file('image');

	        //generate a new name of image
	        $imagefile = time().rand().'.'.$image->getClientOriginalExtension();

	        //Route of image file. where image is uploaded
	        $destinationPath = public_path('/image/');

	        //here we are uploading image in the folder
	        $image->move($destinationPath, $imagefile);
	    }

    	$data = array(
            'image' => $imagefile
    	);

    	//insert image in database
    	DB::table('image_file')->insert($data);

    	//return with success msg
    	return Redirect::back()->with('msg','File upload has been successfully.');
    }

}
Step 7 :- Create Image folder to store images

Step 8 : Now use the command to run your laravel project.
eg : php artisan serve
Now, use this link to run your laravel project on browser
eg : http://localhost:8000/



 Click to Join


Comments 0